選擇語言Bahasa Indonesia (Bahasa Indonesia)Bahasa Malaysia (Malay)Čeština (Czech)Dansk (Danish)Deutsch (German)English (English)Español (Spanish)繁體中文 (Chinese (Traditional))Français (French)한국어 (Korean)Italiano (Italian)简体中文 (Chinese (Simplified))Nederlands (Dutch)日本語 (Japanese)Norsk (Norwegian)Polski (Polish)Português (Portuguese)Română (Romanian)Русский (Russian)Svenska (Swedish)Tagalog (Tagalog)ภาษาไทย (Thai)Türkçe (Turkish)العربية (Arabic)
عفواً، لم نتمكن من العثور على الصفحة التي تبحث عنها. برجاء المحاولة مرة أخرى للصفحة السابقة أو الانتقال لـمركز المساعدة للمزيد من المعلومات
الإنتقال لموجزك الرئيسيOmlouváme se, nemůžeme najít stránku, kterou hledáte. Zkuste se vrátit zpátky na předchozí stránku, nebo se podívejte do našeho Centra nápovědy pro více informací
Přejít do informačního kanáluVi kan desværre ikke finde den side, du leder efter.
 Gå tilbage til den forrige side, eller besøg Hjælp for at få flere oplysninger Gå til dit feed
Die gewünschte Seite konnte leider nicht gefunden werden. Versuchen Sie, zur vorherigen Seite zurückzukehren, oder besuchen Sie unseren Hilfebereich, um mehr zu erfahren.
Zu Ihrem FeedUh oh, we can’t seem to find the page you’re looking for. Try going back to the previous page or see our Help Center for more information
Go to your feedVaya, parece que no podemos encontrar la página que buscas. Intenta volver a la página anterior o visita nuestro Centro de ayuda para más información.
Ir a tu feedNous ne trouvons pas la page que vous recherchez. Essayez de retourner à la page précédente ou consultez notre assistance clientèle pour plus d’informations
Ouvrez votre filMaaf, sepertinya kami tidak dapat menemukan halaman yang Anda cari.
 Coba kembali ke halaman sebelumnya atau lihat Pusat Bantuan kami untuk informasi lebih lanjut Buka feed Anda
Non abbiamo trovato la pagina che stai cercando. Prova a tornare alla pagina precedente o visita il nostro Centro assistenza per saperne di più.
Vai al tuo feed申し訳ありません。お探しのページが見つかりません。前のページに戻るか、ヘルプセンターで詳細をご確認ください
フィードに移動원하시는 페이지를 찾을 수 없습니다. 이전 페이지로 돌아가거나 고객센터에서 자세히 알아보세요.
홈으로 가기Harap maaf, kami tidak dapat menemui laman yang ingin anda cari. Cuba kembali ke laman sebelumnya atau lihat Pusat Bantuan kami untuk maklumat lanjut
Pergi ke suapanDe pagina waar u naar op zoek bent, kan niet worden gevonden. Probeer terug te gaan naar de vorige pagina of bezoek het Help Center voor meer informatie
Ga naar uw feedVi finner ikke siden du leter etter.
 Gå tilbake til forrige side eller besøk vår brukerstøtte for mer informasjon Gå til din feed
Nie możemy znaleźć strony, której szukasz. Spróbuj wrócić do poprzedniej strony lub nasze Centrum pomocy, aby uzyskać więcej informacji
Przejdź do swojego kanałuA página que você está procurando não foi encontrada. Volte para a página anterior ou visite nossa Central de Ajuda para mais informações
Voltar para seu feedNe pare rău, nu găsim pagina pe care o căutaţi. Reveniţi la pagina anterioară sau consultaţi Centrul nostru de asistenţă pentru mai multe informaţii
Accesaţi fluxul dvs.Не удаётся найти искомую вами страницу. Вернитесь на предыдущую страницу или посетите страницу нашего справочного центра для получения дополнительной информации.
Перейти к лентеSidan du letar efter hittades inte.
 Gå tillbaka till föregående sida eller besök vårt Hjälpcenter för mer information Gå till ditt nyhetsflöde
ขออภัย ดูเหมือนเราไม่พบหน้าที่คุณกำลังมองหาอยู่ ลองกลับไปที่หน้าเพจก่อน หรือดู ศูนย์ความช่วยเหลือ ของเราสำหรับข้อมูลเพิ่มเติม
ไปที่ฟีดของคุณNaku, mukhang hindi namin mahanap ang pahina na hinahanap mo. Subukang bumalik sa nakaraang pahina o tingnan ang aming Help Center para sa higit pang impormasyon
Pumunta sa iyong feedAradığınız sayfa bulunamadı. Önceki sayfaya geri dönün veya daha fazla bilgi için Yardım Merkezimizi görüntüleyin
Haber akışınıza gidin抱歉,无法找到页面。试试返回到前一页,或前往帮助中心了解更多信息
前往动态汇总我們好像找不到該頁面。請回到上一頁或前往說明中心來進一步瞭解
前往首頁動態Timeline
TimelineJS is an open-source tool that enables anyone to build visually rich, interactive timelines. Beginners can create a timeline using nothing more than a Google spreadsheet, like the one we used for the Timeline above. Experts can use their JSON skills to create custom installations, while keeping TimelineJS’s core functionality.
Tips & tricks
- Keep it short. We recommend not having more than 20 slides for a reader to click through.
- Pick stories that have a strong chronological narrative. It does not work well for stories that need to jump around in the timeline.
- Write each event as a part of a larger narrative.
Media sources
TimelineJS can pull in media from a variety of sources. Twitter, Flickr, YouTube, Vimeo, Vine, Dailymotion, Google Maps, Wikipedia, SoundCloud, Document Cloud and more!
Examples
Mandela: A Life of Purpose
Chronology of the French Presidential Race
Historic Fall at University of Missouri
North Korea’s Nuclear Ambitions
Bulger on Trial
The Decline of IRS Nonprofit Regulation
Aurora, Colorado Movie Theater Shooting
The Collapse of Microsoft and Nokia’s Mobile Business
How ISIS Spread to 10 Countries
Reported Sexual Assault Cases by Texas Educators
A History of Wine Around the World
The Mystery of Malaysia Airlines Flight 370
A Brief History of the Banana Business
Make a Timeline
 Make your own in four easy steps.
 Having trouble? Watch our video, or see the help section below.
Create your spreadsheet
Build a new Google Spreadsheet using our template. You’ll need to copy the template to your own Google Drive account by clicking the «Make a Copy» button.
Drop dates, text and links to media into the appropriate columns. For more about working with our template, see Making a timeline from a Google Spreadsheet
Get the Spreadsheet Template
Don’t change the column headers, don’t remove any columns, and don’t leave any blank rows in your spreadsheet.
Publish to the web
Under the File menu, Share submenu, select “Publish to the Web.”
Don’t set your Timeline Google Sheet to «anyone with the link can edit.

In the next window, click the green «Publish» button. When asked, «Are you sure…?» click OK. Ignore the URL that appears in the center of the window. Just close the window using the X in the top right corner.
After you close the window, copy the URL in your browser’s address bar. You’ll use this in the next step.
If you get an error message referencing an «Invalid Google URL,» please review the above instructions. You must use the Google Sheets URL from your browser’s address bar, not the one from the «publish to the web» popup.
Generate your timeline
Copy/paste spreadsheet URL into the box below to generate your timeline.
(Make sure you’ve published the spreadsheet.)Optional settings (show) (hide)
Set language, fonts, starting slide and more.
Language
EnglishEnglish (24-hour time)العربيةAfrikaansBahasa IndonesiaBahasa MelayuБеларуская мовабългарски езикCatalàČeštinaDanskहिन्दीDeutschEesti keelελληνικάEspañolEsperantoEuskaraFøroysktFrançaisFryskGaeilgeGalego한국어HrvatskiՀայերէնÍslenskaItalianoעבריתქართულიLatviešu valodaLëtzebuergeschLietuvių kalbaLimba românăMagyar မြန်မာNederlandsनेपाली日本語Norsk (bokmål)Norsk (nynorsk)ภาษาไทยPolskiPortuguêsPortuguês (Brasil)RumantschРусский языкසිංහලSlovenščinaSlovenčinaSrpskiсрпскиSuomiSvenskaTaiwaneseTagalogதமிழ்తెలుగుTürkçeУкраїнськаاُردُوTiếng Việtفارسی中文Map Type
Currently all Google’s base maps are supported.
When creating a Google map, style it the way you would like it to appear, and then paste the resulting link into your Google Spreadsheet.Default start slide
You can tell TimelineJS to start at a specific slide number.
Initial zoom level
Zoom Level
The zoom level at which the timeline portion of TimelineJS will display on load. Specify a value from 0-10 (default is 2). Smaller numbers show a greater span of time.
Start at the end
Begins the timeline on the last slide.Show nav on top
Debug
In debug mode, the JavaScript console will display logging messages.Use hash bookmarks
Use this to link directly to your timeline.
If you’re embedding on Medium.com or other oembed-aware services, just paste this link on a line by itself where you want your timeline to appear.
https://cdn.knightlab.com/libs/timeline3/latest/embed/index.html?source=1xuY4upIooEeszZ_lCmeNx24eSFWe0rHe9Zdqh3xqVNk&font=Default&lang=en&initial_zoom=2&height=100% Embed
Preview Open Preview in a new window
- Use our spreadsheet template
- Supported Media Types
- JSON data format reference
- Changing the Appearance of your Timeline
- Timeline Configuration Options
- Using TimelineJS in Javascript
How do I edit my timeline?
Once you’ve created a timeline, you can make changes by going back to your Google spreadsheet.
Changes you make to the spreadsheet are automatically available to your Timeline—you don’t need to repeat the ‘publish to the web’ step (step #2). If you want to make changes to the optional settings, you will need to update your embed code, but if you are only changing content in the spreadsheet, then there’s nothing else to do.What web browsers does TimelineJS work with?
Our primary development and testing browser is Google Chrome. We adhere closely to web standards, so we believe that TimelineJS should work effectively in all modern web browsers. TimelineJS is known to not work with Internet Explorer versions before IE10.
Some of my slides aren’t showing up. Where are they?
If the slides which aren’t appearing are at the end of your timeline, look for a blank spreadsheet row right after the last slide which is appearing.
When TimelineJS asks Google for your data, Google only sends up to the first blank row, so TimelineJS is actually showing everything that it can. Don’t forget to look for hidden spreadsheet rows or rows with a very small height.What are my options for changing how my Timeline looks?
First, make sure you know everything you can do in the spreadsheet configuration, like background colors and images. Also, check out the optional settings part of ‘step 3’ of the authoring tool. You can change the fonts, the position of the timeline navigation, and the initial zoom level. If you still want to do more, there are some configuration options available. Most of those are for fine tuning, but some of them may be helpful.
There aren’t enough options.
I want more control over the [font size/color/etc]. Can I change things using CSS?Because there are so many details to the styling, this is not exactly simple, but, if you have some technical capacity, you can override TimelineJS’s CSS rules and have complete control over the look of the timeline. For details, see Overriding Timeline’s Styles.
How can I categorize or group my events?
Every event in a timeline can have a group property. Events with the same group are shown in the same row or adjacent rows, and the common value of their group property is used as a label at the left edge of the timeline. Groups can be set using the ‘group’ column in the Google Spreadsheet or the ‘group’ property of a JSON slide object. TimelineJS does not support any other special styling for events in the same group.
The first slide in my timeline isn’t the first chronologically. Why did this happen?
When using the Google Spreadsheet to configure your timeline, if you put the word
titlein thetypecolumn, that slide will be put at the front, regardless of the values in the date columns. See the Google Spreadsheet documentation for more information.Can I make media images clickable?
No. Many of TimelineJS’s media types are interactive, and so would not be able to handle a link, and other of TimelineJS’s media types have terms of service which require a link back to the source of the media. As an alternative, consider using HTML to add links in the caption, credit, or text for the slide.
How can I format text (add line breaks, bold, italics)?
TimelineJS’s text fields (headline, text, caption, and credit) all accept HTML markup. A full tutorial on HTML is outside the scope of this FAQ, but here are a few basics:
- Wrap paragraphs in
<p></p>tags to create line breaks. - Wrap text in
<b></b>tags for bold text and<i></i>for italics
- Wrap paragraphs in
How do I enter BCE dates?
To enter dates before the common era, just use a negative value for the year. Of course, you can also enter month and date if you need them.
How do I create very ancient dates?
Generally, you don’t have to think about it — just enter the dates you want.
Timeline can handle dates literally to the beginning of time. For dates more than about 250,000 years ago, only the year is usable. Support for those older dates is still relatively new, so if anything seems off, visit our tech support site.Who can access the data in my Google spreadsheet?
You must make the data public to the web to use TimelineJS with a Google Spreadsheet as the data source. Normally, the data is still only visible to people who know the link, so if you publish a timeline privately, outsiders are unlikely to see the data. However, it is still public, so you must decide if that is acceptable.
Privacy is very important to me. How should I use TimelineJS?
If you want complete control over who can see the information in your timeline, you cannot use Google Spreadsheets, and you cannot use our standard
iframeembed code. Instead, you must use JSON format for the data and instantiate the timeline directly using javascript. You can then use standard web server security measures to control who has access to your timeline and the data used to create it.Will my spreadsheet get picked up by search engines?
Under normal circumstances, Google tells search engines not to index spreadsheets which are published to the web. Of course, if the page is public on the web, it is possible that a search engine will disregard those instructions.
Can I use TimelineJS with WordPress?
It depends. TimelineJS does not work with WordPress.com sites. We are researching ways to address this.
If you are able to install plugins to your WordPress installation, we have a WordPress plugin for Timeline. It supports embedding Timelines with WordPress «shortcode», and as of version 3.3.14.0, it also has experimental «oembed» support. That means that you can take a direct URL to a timeline (like you get with the «get link to preview» button) and put it in a post on a line by itself, and it should be embedded. (Make sure you’ve updated the plugin before you try it.)Is TimelineJS free for commercial use?
TimelineJS is released under the Mozilla Public License (MPL), version 2.0. That means that TimelineJS is free to «use, reproduce, make available, modify, display, perform, distribute» or otherwise employ. You don’t need our permission to publish stories with TimelineJS and you don’t need to pay us any fees or arrange any further license beyond the MPL. To read more about what you can do with TimelineJS, read our license page.

 (Make sure you’ve published the spreadsheet.)
 When creating a Google map, style it the way you would like it to appear, and then paste the resulting link into your Google Spreadsheet.
Preview Embed
Help
Need help? First, please be sure to look at our list of frequently asked questions below. If you’re brand new to Timeline JS, you may also want to watch our introductory video.
If you don’t find an answer there, try our support forums or use our tech support web form. Please be clear with your question, include a link to your spreadsheet, and if appropriate, a link to a page which shows the issue with which you need help. We can only answer support questions in English. We try to be prompt, but please understand that we do not have a dedicated tech support staff.
Find a bug? If you are confident you have found a bug, please report it as a GitHub issue. Be sure to include detailed instructions on how to reproduce the bug. If you’re not sure, please start with the tech support system.
Technical documentation
Go further with Timeline:
Frequently asked questions
 Changes you make to the spreadsheet are automatically available to your Timeline—you don’t need to repeat the ‘publish to the web’ step (step #2). If you want to make changes to the optional settings, you will need to update your embed code, but if you are only changing content in the spreadsheet, then there’s nothing else to do.
 When TimelineJS asks Google for your data, Google only sends up to the first blank row, so TimelineJS is actually showing everything that it can. Don’t forget to look for hidden spreadsheet rows or rows with a very small height.
 I want more control over the [font size/color/etc]. Can I change things using CSS?
 Timeline can handle dates literally to the beginning of time. For dates more than about 250,000 years ago, only the year is usable. Support for those older dates is still relatively new, so if anything seems off, visit our tech support site.
 Instead, you must use JSON format for the data and instantiate the timeline directly using javascript. You can then use standard web server security measures to control who has access to your timeline and the data used to create it.
 It supports embedding Timelines with WordPress «shortcode», and as of version 3.3.14.0, it also has experimental «oembed» support. That means that you can take a direct URL to a timeline (like you get with the «get link to preview» button) and put it in a post on a line by itself, and it should be embedded. (Make sure you’ve updated the plugin before you try it.)
Storytelling Tools
We build easy-to-use tools that can help you tell better stories.
StoryMap JS
Maps that tell stories.
Juxtapose JS
Easy-to-make frame comparisons.
Soundcite JS
Seamless inline audio.
View Morejavascript: инструкция goto –
Задавать вопрос
спросил
Изменено 10 лет, 2 месяца назад
Просмотрено 20 тысяч раз
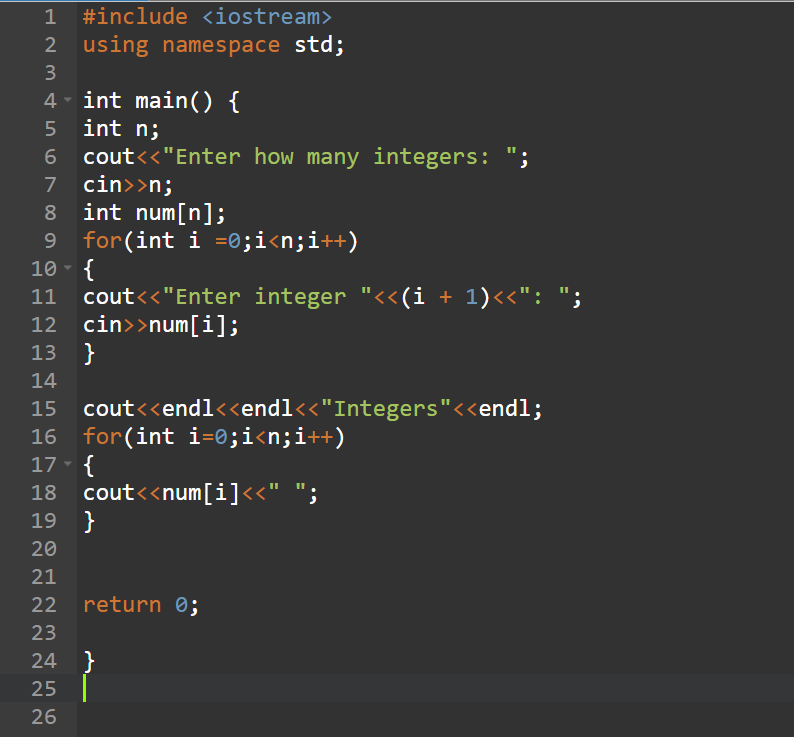
У меня есть цикл for, но в одном условии я хочу пропустить некоторые шаги, чтобы я использовал оператор перехода к …
 for (var rows = 0; rows < result.data.length; rows++) {
  [фунт] topOfLoop:
  переменная строка = результат. данные[строки]
  если (строка[0] == "") {
    перейти к началу цикла;
  }
  ----- // какой-то код
}
 данные[строки]
если (строка[0] == "") {
перейти к началу цикла;
}
----- // какой-то код
}
данные[строки]
если (строка[0] == "") {
перейти к началу цикла;
}
----- // какой-то код
}
Не работает? Может ли кто-нибудь сказать мне, как это можно сделать?
- JavaScript
10
Уверен, что вы хотите использовать continue; :
 для (var rows = 0; rows < result.data.length; rows++) {
    переменная строка = результат.данные[строки];
    если (строка[0] == "") {
        продолжать;
    }
    // какой-то код
}
2
я хочу пропустить несколько шагов, чтобы использовать оператор goto...
Использовать оператор continue вместо goto
 для (var rows = 0; rows < result.data.length; rows++)
    {
        переменная строка = результат.данные[строки]
        если (строка[0] == "")
        {
           продолжать;
        }
2
Используйте оператор continue в своем коде;
Оператор continue передает управление следующей итерации заключающий оператор итерации, в котором он появляется.
Это один из операторов Jump.
 если (строка[0] == "")
{
     продолжать;
}
2
Зарегистрируйтесь или войдите в систему
Зарегистрируйтесь с помощью Google
Зарегистрироваться через Facebook
Зарегистрируйтесь, используя электронную почту и пароль
Опубликовать как гость
Электронная почта
Требуется, но не отображается
Опубликовать как гость
Электронная почта
Требуется, но не отображается
Моделирование перехода в JavaScript · skip
Skip, новый язык программирования, над которым мы работаем, поддерживает сопоставление с образцом. Чтобы реализовать это эффективно, Тим Закиан применил метод, описанный в статье «Компиляция сопоставления шаблонов с хорошими деревьями решений». Идея состоит в том, чтобы превратить правила сопоставления с образцом в ациклический граф, который максимизирует совместное использование общих подзадач.
В статье есть небольшой пример: для двух списков, построенных с помощью Cons/Nil, если первый содержит ровно 1 элемент, то вернуть 1. Если второй содержит ровно 1 элемент, то вернуть 2. В противном случае вернуть -1. Код пропуска выглядит так:
 (х, у) совпадение {
  | (Минусы(_, Nil()), _ ) -> 1
  | (_, Cons(_, Nil())) -> 2
  | (_, _) -> -1
}
Если вы реализуете алгоритм в документе (который легко читать, если вас интересуют подробности), вы получите график, который будет выглядеть следующим образом:
В конце дня, выводом будет некая сборка, выполняющая переходы к меткам, но в данном случае нас интересует язык высокого уровня. Для языков, поддерживающих goto, таких как C или PHP, код вывода будет выглядеть примерно так:
 A: если (x instanceof Cons) {
      перейти к Б;
    } еще {
      перейти к С;
    }
B: если (x. tail instanceof Nil) {
      вернуть 1;
    } еще {
      перейти к С;
    }
C: если (y instanceof Cons) {
      перейти к D;
    } еще {
      возврат -1;
    }
D: если (y.tail instanceof Nil) {
      вернуть 2;
    } еще {
      возврат -1;
    }
 tail instanceof Nil) {
вернуть 1;
} еще {
перейти к С;
}
C: если (y instanceof Cons) {
перейти к D;
} еще {
возврат -1;
}
D: если (y.tail instanceof Nil) {
вернуть 2;
} еще {
возврат -1;
}
tail instanceof Nil) {
вернуть 1;
} еще {
перейти к С;
}
C: если (y instanceof Cons) {
перейти к D;
} еще {
возврат -1;
}
D: если (y.tail instanceof Nil) {
вернуть 2;
} еще {
возврат -1;
}
Goto в JavaScript
К сожалению, у нас нет такой роскоши, как goto в JavaScript. Но мы можем проявить творческий подход. Есть малоизвестная особенность JavaScript, которая позволяет вам вырваться из вложенных циклов:
 внешний: пока (истина) {
         в то время как (истина) {
           ломать внешний;
         }
       }
Получается, что даже петля не нужна, можно поставить метку на блок и вырваться из него.
 А: {
  Б: {
    перерыв А;
  }
}
Это переход в конец блока А. Учитывая этот трюк, мы можем переписать наш первоначальный пример, вложив помеченные блоки.
 Д: {
  С: {
    Б: {
      если (x instanceof Cons) {
        перерыв Б;
      } еще {
        перерыв С;
      }
    } // конец Б
    если (x. tail instanceof Nil) {
      вернуть 1;
    } еще {
      перерыв С;
    }
  } // конец С
  if (y instanceof Cons) {
    перерыв Д;
  } еще {
    возврат -1;
  }
} // конец D
if (y.tail instanceof Nil) {
  вернуть 2;
} еще {
  возврат -1;
}
 tail instanceof Nil) {
вернуть 1;
} еще {
перерыв С;
}
} // конец С
if (y instanceof Cons) {
перерыв Д;
} еще {
возврат -1;
}
} // конец D
if (y.tail instanceof Nil) {
вернуть 2;
} еще {
возврат -1;
}
tail instanceof Nil) {
вернуть 1;
} еще {
перерыв С;
}
} // конец С
if (y instanceof Cons) {
перерыв Д;
} еще {
возврат -1;
}
} // конец D
if (y.tail instanceof Nil) {
вернуть 2;
} еще {
возврат -1;
}
Вуаля! Нам удалось превратить весь наш goto во что-то, что может запускать JavaScript.
Переход назад
В нашем случае нам нужны были только прыжки вперед. Если нам нужны обратные переходы, идея состоит в том, чтобы использовать continue вместо break. К сожалению, JavaScript не позволяет вам продолжать работу только с блоками, поэтому нам нужно использовать цикл while.
 А: в то время как (истина) {
     если ( ... ) {
       продолжить А;
     }
     перерыв;
   }
Дальнейшая оптимизация
В случае A мы либо переходим к B, либо к C. Поскольку B находится сразу после A, в этом случае переход фактически не нужен. То же самое для перехода к D, так что мы можем удалить оба. Также можно изменить порядок блоков, чтобы создать больше возможностей для удаления блоков таким образом, хотя в данном случае это не помогает.